Thursday 22 May 2014

Simple, Hearty & Delicious Lentil & Spinach Soup!

Great Lentil & Spinach Soup Recipe!

Great vegetarian soup that even an avid meat eater such as myself could enjoy!

I was pleasantly surprised when it tasted sooooo good lol

(My wife had been begging me for months to get on some vegetarian dishes XD)


OM NOM NOM! :3

What You'll Need:

-1 15oz can of Diced Tomatoes w/juices. (about 1 3/4 - 2 cups)
-1 1/4 Cup Green Lentils (rinsed)
-1 Tbsp Olive Oil
-1 Medium Celery Stalk (small dice)
-1 Medium Carrot (small dice)
-1/2 a Medium Yellow Onion (small dice)
-3 Medium Garlic Cloves (minced)
-1 Bay Leaf
-1/2 Tsp of Fresh Chopped Thyme Leaves
-1 Quart (4 Cups) Vegetable Broth
-1 Tsp Red Wine Vinegar
-2 oz of Spinach leaves (half a bunch-ish)
-Kosher Salt
-Ground Blak Pepper


Step 1: Create a "Mirepoix" (aka. The soups soul)

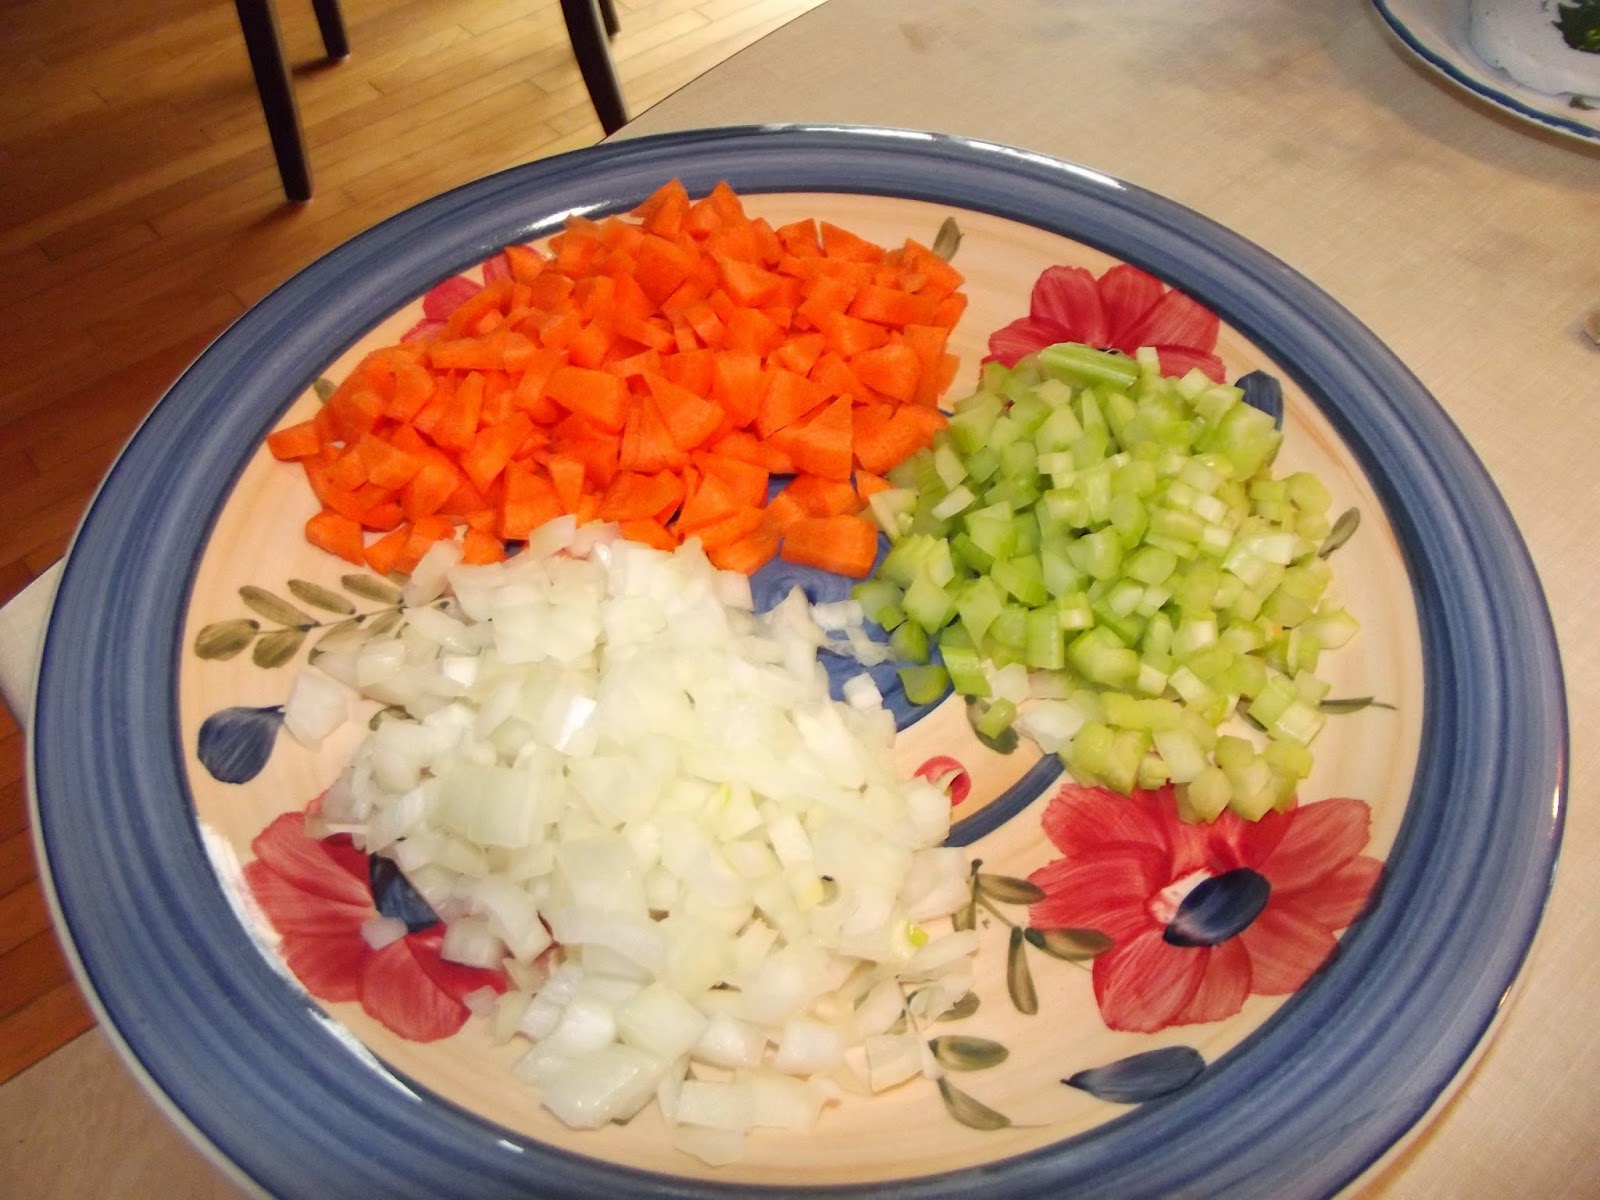
"Mirepoix" is just a fancy french word for diced carrots, onions and celery. The three common aromatic vegetables and arguably the building block of most good soups. Most important thing here is to keep the dice of all three veggies about the same size so that they cook evenly.

Step 2: Cooking the "Mirepoix"

Heat the olive oil in a large pan (or pot) on medium heat until it is hot and shimmering, about 3 minutes.
Then cook the mirepoix until the veggies are soft and onions begin to be transparent, about 10 minutes. It should look something the picture above. (my veggies browned a tiny bit because daddy duties called and didn't stir enough. But was great nonetheless!)
Proceed to add the minced garlic and stir constantly cooking until you smell the garlic, about 1 minute. Do NOT cook the garlic too long. Thats about the only thing that can screw this soup up. 1 minute is more than enough. 
Then add a few pinches of salt and pepper to taste.

Step 3: The Soups Body

 Add the vegetable stock and tomatoes (with juices).

Then add your lentils, thyme and bay leaf. Stir well and cover until simmering, bout a good 15 minutes. Once simmering, reduce heat to low and simmer until lentil and vegetables are soft. I'd say another good 15 minutes. At this point taste it and adjust your seasoning.

And the final touch! Add your spinach leaves and stir until they are wilted. Served warm!


Quick Tips:

- You can easily cook bacon and use the fat in the pan that instead of olive oil to cook the mirepoix and then throw in the bacon in with the spinach at the end.
-You can also substitute vegetable stock for chicken stock.
-And since it's in small quantities, the red wine vinegar can certainly be replaced by red cooking wine.

Enjoy =)

Wednesday 23 April 2014

Make The Lame Look Great!

A Short Piece About Presentation

Even the most "meh" meals can look nice ;)

Gonna keep this relatively short as tonight I have lots to do, so here we go. I will be focusing on breakfasts in this piece. 

Color = Love 

Often breakfast foods are on the bland side of things when it comes to color. I'm mostly thinking:Pancakes, eggs, hashbrowns, most cereals, crepes, french toast, etc. They are almost always brown and yellowish, while always delicious doesn't look the best when trying to impress guests or a loved one.
Bottom line is: Get Some Fruit! I've gotten so many compliments on simple little arrangments for how bright they are. Bright fruit are amazing when it comes to brightening up a plate. Strawberries, blueberries, kiwi, apples, etc. Many of these go very well with most breakfast foods, are loaded with vitamins for the day and is sure to make whoever is enjoying it smile!

 Balance is Key

Very simple thing to remember. Try to keep everything balanced as though in a painting. Dividing the foods usually looks great and keeps it clean. Don't just throw everything on the plate wherever it decides to land. Take some care in plating. and don't be afraid to experiment (Added chocolate sauce on the fruit, was good at the end but might make the rest taste odd if you ate it first)

 Stay Creative!

This can sometimes be hard, especially if you're not the creative type (such as myself). But every little thing helps. Wether you added a smiley face, pokemon, building or whatever, it always shows you care about both the food and the people who are eating it. As shown below all I did in this case was make little stars by cutting an apple horizontally and then trimming the middle creating a star shape. It's not great obviously (like I said, slightly creatively lacking) but even with this simple accent, my wife, father in-law and brother in-law were all amazed (somehow lol)

 Most important of all...

PLAY WITH YOUR FOOD!

Thanks for stopping by =)

Sunday 6 April 2014

Pineapple Upside-Down Cake

Delicious Pineapple Upside-Down Cake!

Super simple, super awesome!

(Just to point out usually there are maraschino cherries in the center of the pineapple but one of the guests were allergic)

Very quick and simple, especially if you're using canned pineapple!

What You'll Need:

Topping:
-1/3 Cup Melted Butter
-1 Cup  Packed Brown Sugar
-About 9 Pineapple Rings
-Bottle of Maraschino Cherries

Cake:
-1/2 Cup Softened Butter
-1 Cup Granulated Sugar
-2 Eggs
-1 Tsp Vanilla Extract
-3 Tbsp Pineapple Juice (or reserve from can)
-3/4 Cup Milk
-1 3/4 Cup Flour
-1 Tbsp Baking Powder
-1/2 Tsp Salt
-Preheat oven to 350F-

Step 1: Pour melted butter into the 9" baking pan of your choice. I used a rectangle one but circle pans work fine of course.
 
Step 2: Sprinkle brown sugar as evenly as possible over the butter, try to cover as much surface as you can.
 
Step 3: Place Pineapple rings evenly on the surface of the topping mix. I cut my own because I find them sweeter, but canned pineapples work just as good. This is where you would also place Maraschino cherries in the center of the rings and in areas with nothing covering the sugar. Since one of my guests were allergic to Maraschinos I just used more pineapple.

Step 4: In a mixer, cream butter with sugar until well blended, then add vanilla, eggs and pineapple juice.

Step 5: Once blended smooth add the dries(flour, baking powder, salt)

Step 6: One completely combined, pour batter over the pineapple topping and spread smooth & even.

Step 7: Bake for 45-50 Minutes until toothpick comes out clean.

Step 8: Score the sides with a knife to make sure it doesn't stick and allow to cool for 10 minutes. Then place a pan/tray over the cake and flip over! Keep it flipped for about a minute before removing pan. 

Voila! Like I said it's very easy to make and sure to please almost anyone!

Enjoy!

How To Cut A Pineapple

Cutting A Pineapple

Nothing beats fresh, ripe pineapple when in season. If you can get your hands on some, here's how ya cut 'em!

What You'll Need:

-A Large, Sharp knife

-A Cutting Board

- (and of course) 1 Whole Pineapple


First thing you want to do is remove the top and bottom of the pineapple. You can even plant the top to grow your very own pineapple!


Using the sharp knife score downward the sides of the pineapple about a 1/2". I ususally rinse the pineapple at this point.


From there, simply cut the pineapple into slices.

Core the slices using the knife and voila! Fresh amazing pineapple that can be eaten as is or used in a delicious "Pineapple upside-down Cake"!

Thanks for stopping by =)

Saturday 5 April 2014

Apple Crumble Cheesecake!

 The Forever Satisfying Apple Crumble Cheesecake!

Impress your family with this apple filled cheesecake topped with amazing streusel and caramel!

(In pizza pan because my spring form pan isnt the best and leaks butter sometimes)

When I made this cheesecaked everyone couldn't stop with the compliments. It hit a note with everyone in the room (even my grandfather who normally doesn't compliment lol). This delicious and apple-y desert is great for any occasion.

What You'll Need:

-2 Granny Smith Apples, Peeled, Chopped
-1/2 tsp of Ground Cinnamon
-3/4 cup plus 2 Tbsp Granulated Sugar, Divided
-1/2 cup Flour
-1/2 cup Packed Brown Sugar
-1/2 Cup Large Flake Rolled Oats
-1/2 Cup Butter, Melted, Divided
-1 1/4 cups Graham Crumbs
-3 Pkgs (250g each) Brick Cream Cheese, softened
-1tsp Vanilla Extract
-3 Eggs
-2 Tbsp Caramel Sauce (or more ;p)

Step 1: Heat oven to 350F. Cook apples, cinnamon and 2 Tbsp of granulated sugar in a saucepan on medium for about 7-8 minutes or until the apples are nice and tender, stirring often. Remove from heat.

Step 2: Mix flour, brown sugar, oats and half the butter until well blended; spread onto a baking sheet and back for about 8 minutes or until lightly browned.

Step 3: Mix Graham crumbs and remaining butter; press onto bottom of a 9inch springform pan. Top with apple mixture, spreading to within 1/2" of the edge.

Step 4: Beat the cream cheese, remaining granulated sugar and vanilla until blended. Add eggs, 1 at a time, mixing on low speed after each just until blended; pour over apple mixture.

Step 5: Bake for 40-50 minutes or until centre is almost set. Run a knife around rim of the pan to loosen cake. Cool before removing the rim. Refrigerate cheesecake for minimum 4 hours. Top with streusel and caramel sauce!

And also a great touch is using ginger cookies to replace the graham crumbs. 

Enjoy!

Sunday 23 March 2014

Snowy Treat!

Snow Ice Cream

(sorry a bit late in the year for this one but I'm sure many can still try it out where they are)

A truly simple and fantastic treat for anyone around fresh snow!
What you'll need:
-1/2 cup of Sugar
-1 Cup of Milk or Cream (18% worked perfect for me)
-1tsp of Vanilla Extract (or any flavor you want)
-5-6 Cups of freshly fallen, CLEAN snow

Step 1: Collect your snow and place it in a metal bowl (metal keeps it cool longer) and then place in the freezer while you prepare the rest.

Step 2: Combine sugar, milk or cream and vanilla and whisk until sugar has dissolved. (at this point you really can add any flavor you want, I just wanted vanilla flavor)

Step 3: Gradually add snow until it is of ice cream consistency or whatever your liking may be.


Step 4: Add favorite topping(s) and enjoy!

Note that you can easily store this in the freezer as long as it is covered. Mine lasted a good week before essentially freezing over.

Saturday 22 March 2014

Eggs In A basket

Eggs in a Basket

Simple, delicious and a great way to surprise a fellow egg/bread lover =P

What you'll need:
-Sliced Bread
-Eggs
-Salt & Pepper (optional but suggested)
-Butter

So the first thing we'll do is cut a circle shape into the bread of your choosing

Try not to get it too close to the edges cuz it might break while cooking

 Melt some butter in a pan large enough to hold the bread (I do 2 at a time usually). Spread the butter around and coat both sides of the bread as evenly as you can with it.


Once both sides are browned put a little bit of butter in the holes so the eggs don't stick and simply crack an egg right into the hole!


Once the egg is in all you have to do is wait. Once you see the egg white cook about half way through the toast it's usually ready to flip. Of course this also depends on wether you like runny yolk or not.


Once you flip 'em they should look more or less like this. Somehow the yolk broke on the right one but oh well . (notice the pinchy pie in the background lol) Cook another minute or so. This is where you can poke the middle where the yolk is to determine when it's right for you. Very easy to tell when it's more cooked(firm) or still loose.


All done to perfection! My wife doesn't like runny yolk so they're extra cooked =P
Hope you liked the recipe!
Share the love!